

SEO for Images – Ultimate Guide
There are many different elements to SEO, which means that oftentimes, the smaller aspects are unintentionally overlooked. But if your business is striving to practice optimal on-site SEO, the smaller steps – such as optimizing your images – are equally as important as the big ones.
This is especially true if those steps are something that your business rivals aren’t paying attention to! Take the time to get image optimization right, and you’ll leave the competition in the dust.
Related: Improve Search Engine Rankings With Structured Data
Should I include images on my webpages?
Yes, Let’s face it; nobody wants to stare at a page filled with blocks of text and no color! It looks bad, and it gives a bad impression. And hey, we all loved picture books at school, right?
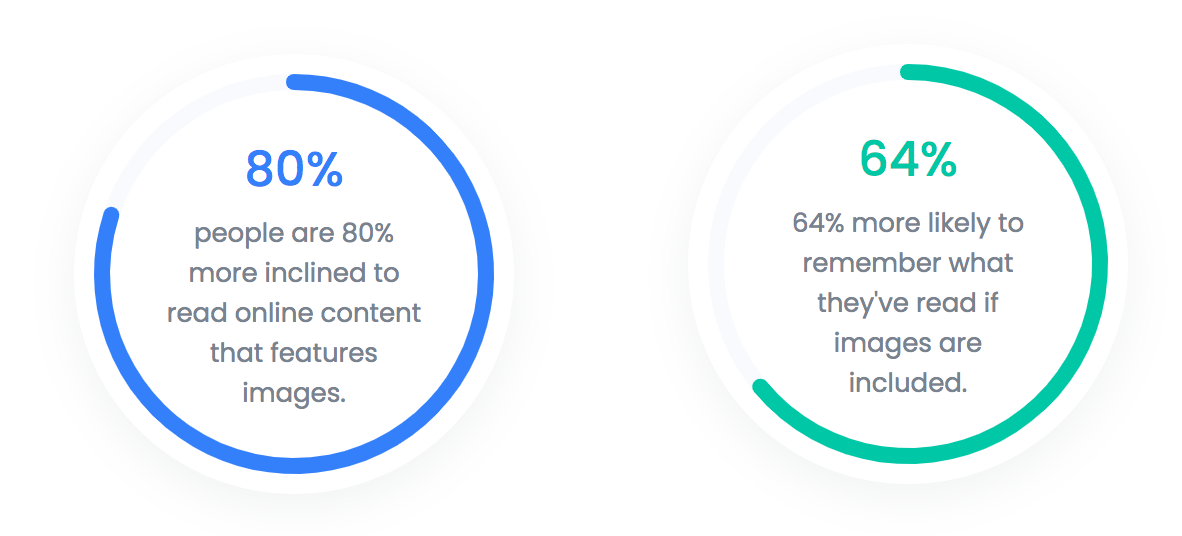
Research has proven that people are 80% more inclined to read online content that features images and 64% more likely to remember what they’ve read if images are included.
Are Images Important for SEO?
Yes, leading on from the above points, it’s important to note that Google’s algorithm studies behavior metrics. That is, it pays attention to bounce rates and how long site users spend on your pages. This all influences your site’s performance in search engines.
Related: How to optimize a website for a small business
Additionally, search engine crawlers can see the text behind your images, so if you focus on SEO for images, you have direct control over what they see and know about your site.
Ever wonder which of your website images drives the most traffic or why your images don’t show up in image searches? Well, the answer is easy, the solution might be as easy as optimizing your images.
Tips to Improve SEO With Images
Do the following things for all of the images on your website’s pages, and you’ll optimize your way to success! You’re welcome.
1. Use high-quality images relevant to the text
Remember that user experience thing we talked about? Well, this tip relates to all that jazz. Using images that aren’t relevant to the page content will only confuse the site user and lead to them clicking away. Not good! Similarly, using badly cropped or blurry images will make your business look unprofessional, and your web content look pretty darn awful.
Be wary when it comes to finding stock images. There are plenty of online resources where you can find royalty-free images, so stick with reputable sites for those and be sure not to use ones you don’t have rights to.
For any blog posts or pages on your website, include at least one relevant, high-quality image within the body text to make it attractive and memorable. Use your own custom photos and images whenever possible to avoid image duplicates.
This leads to finding the perfect quality-to-size ratio. How do you do this? Programs like Microsoft Paint and Mac Preview can help here. They make it easier to resize your image files (while maintaining image quality) before you upload them to your site.
Adobe Photoshop and other open source image editors like Gimp has a “Save for Web” feature that gives you the smallest file size/best resolution. Once you’re done, compress your image files using a tool such as JPEGmini or TinyPNG.
2. Use the right file type
You may already know that there are four main image file types as of 2019, but perhaps don’t fully understand the differences between them. When you figure it out, you’ll be better equipped to choose the right one for your requirements.
What are the most common image file types on the web?
JPG, PNG, GIF, and SVG.
JPG Also known as JPEG (Joint Photographic Experts Group)
JPG is among the most common file type for images and one that is widely supported so therefore widely used. It’s a format that uses small file sizes. However, JPG image quality isn’t always as good as a PNG file; furthermore, it doesn’t support transparent backgrounds.
PNG (Portable Network Graphics)
The plus sides of PNG files are that they support text descriptions of images (hello, SEO) and deliver high image resolution. The downside? They require larger file sizes, so they’re often best used for special situations like logos, illustrations, icons, and other types that require transparency.
GIF (Graphics Interchange Format)
However you pronounce it, a GIF is an excellent choice for simple images. GIFs support transparent backgrounds and small file sizes – but – they don’t support such a wide color range as other formats. They are widely used for short animations.
SVG (Scalable Vector Graphics)
SVG is a vector-based image that is created using points, lines, shapes, and backgrounds. SVG images can be scaled and compressed to any size without losing quality.
You can use text editors to create and animate SVG images, although drawing programs like Sketch or Inkscape are more suitable. SVG images are mostly used for computer-generated graphics like logos, illustrations, and icons.
Image file type main comparisons
| JPG .jpg |
PNG .png |
GIF .gif |
SVG .svg |
|
|---|---|---|---|---|
| Raster graphics or Bitmap | ||||
| Transparency | ||||
| Animation | ||||
| Vector | ||||
| Lossy |
JPG Vs PNG
The two images below are identical and have the same dimensions with only one difference; one has the extension .jpg and the other one .png.
Besides quality difference which is barely appreciated by the human eye, the PNG image has no background (transparency). Transparency is excellent when you want to add a custom background or no background at all.
GIF example
GIFs are a popular file extension for social media (memes), website animated illustrations, and visual explanation images, like the one below. GIFs are a series of soundless image layers that will loop continuously.
PNG Vs SVG
The two images below were exported (saved) with a different filename extension. The PNG version, although it offers transparency, it is of less quality and bigger size (thumbs down). The SVG version keeps quality even if you scale it, and it is three times smaller in size (we have a winner).


Which image file type should I use for my website?
For photos, galleries, product images, hero images, and graphics that don’t require transparency use JPGs. Use PNGs for illustrations, logos, icons, and high-quality photography, keep in mind file size, you want your images less than 500 KB. Use GIFs for animated images, visual demonstration animations, and memes. SVG is the best choice for logos, computer-generated illustrations, and icons.
#3. Change the Filename to Something Relevant – and Include a Keyword
Here’s a step that is woefully overlooked – yet it’s so easy! Before adding an image to your site, customize the filename to something relevant to the content. Include one of your keywords too. For example, if your brand is called Awesome and the particular page is about a plaid shirt that you sell, then your image filename could be awesome-plaid-shirt.jpg.
Related: How To Display Reviews In Google Search Results
The majority of site users won’t see this filename – but search engines will, and it gives them more information about your site’s page and the keywords associated with it. A good rule of thumb is to label the image how you think people would search for the item, looking at your website analytics would help you determine if you need to re-evaluate your naming process.
We name the image below as “illustration-house-by-river-in-the-mountains.jpg.“ By describing the image in the file image name, you will help search engines understand and read your image which will boost your image search rankings.

#4. Reduce the Size of Your Image Files
This one doesn’t take a genius to figure out: smaller image files take less time to load. Simple! If you decrease the size of your image files, you’ll increase the load speed of your page, and fewer site users will click away. Woop! It’s also a fact that Google considers page load time an important ranking factor. Gotta please that algorithm!
Here are the stats:
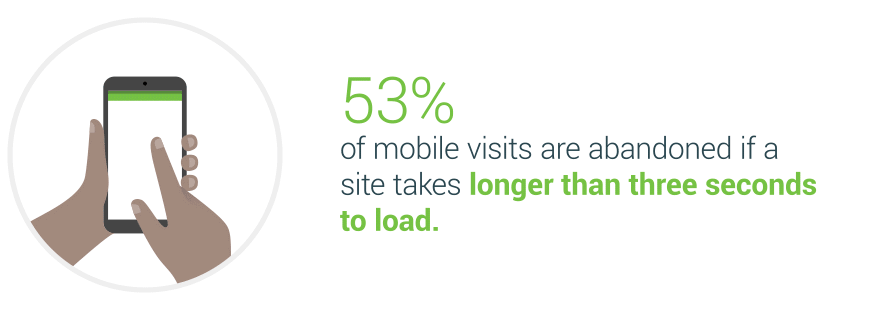
• Even though around 50% of users won’t wait 3 seconds (we feel their pain) for an eCommerce site to load, globally (and conversely) the average page load time is increasing, like whut?
• Amazon did the math and discovered that if their pages were just 1 second slower when loading, they’d lose $1.6 billion a year… A. Year. Can you imagine??
Think about it: don’t you get impatient when a webpage takes fuh-rever to load? Well, so do your site visitors! So speed things up!
How to reduce image file size?
- A quick way to reduce image file size is by changing the resolution. Open your image in your preferred image editing software and change the resolution to something smaller.
- Export it in a different file format and reduce a little bit of quality. Image editing software like Photoshop or Gimp will display file size before exporting, thus making it easy to review before exporting. Keep in mind image quality before exporting.
- Crop the image. Sometimes it is not necessary to have all the entire image displayed on your website. File size can be significantly reduced by cropping unnecessary sections of the image.
- Change color depth /mode. for simple images like illustrations or icons, you don’t need to use an image format that supports millions of colors.
- Use an image compression tool.
The size in pixels of your images also needs to be suitable for the platforms in which you want them to appear. For example, for e-commerce, product images should be in the 500 -1000 pixels size range, while banners, sliders, and other larger images should be in the 1200 – 1600 pixels range.
Make sure your images are loading correctly, and they drive visitors towards your website by doing internet searches and using search engine analytics. Proper labeling and sizing can make a significant difference in your search engine rankings.
#5. Optimize Alt Tags and Image Title
The alt tag is an image HTML attribute tag that provides a text alternative description of an image for search engines in case it can not be loaded/displayed by the browser. Again, most site users won’t see your alt tags, but search engine crawlers will, and that’s what matters in this instance. Alt tag text tells search engines what the image is all about.
Related: SEO fundamentals
Add alt tag text for all your images, including a brief description of the image and your primary keyword.
The image title is another attribute that can be added to the image tag in HTML. The title attribute appears in a popup when a user takes the mouse over the image. This attribute provides extra information to the user giving a better user experience.
<img src="/image-file-name.jpg" alt="alternate text for image" title="A proper title attribute">
#6. Add the HTML5 Figure and Figcaption Tags
The alt tag provides a text-based alternative for search engines to understand images. However, there is a secret weapon to put the alt tag on asteroids – the <figure> and <figcaption> tags. These HTML5 elements represent a unit of content, that is self-contained and referenced as a single unit.
In the following code example, the <img> and <figcaption> tags are enclosed inside the <figure> tag working as one entity to provide search engine crawlers with more information about the image.
       <figure>
    <img src="/image-file-name.jpg" alt="alternate text for image" title="A proper title attribute">
   <figcaption>A caption for the above image. </figcaption>
 </figure>
#7. Use a Content Delivery Network (CDN)
The main goal of using a CDN for static content like images is to deliver these assets faster to the website visitor. Freeing up your server from this task improves website speed and reduces server requests, thus improving SEO.
Benefits of using CDN for images
- Store and deliver static content like images closer to the site visitor
- Freeing up your server from directly delivering the assets
- Reduce the number of requests from your server
Should I use a CDN for my website?
Depends, if you are a small local business serving specific locations with relatively low website traffic, then the answer is no. On the other hand, if your daily website traffic is in the thousands, you should definitely use a CDN to improve website performance.
If you’re using a trusted, reliable hosting service then you’ll know your website and images will be displayed to your visitors as they should be. It’s not rocket science: a great website equals better conversion rates equals a happier you.
#8 Include Images in Your Sitemap
A sitemap better enables Google to crawl your site pages and get them indexed; they actively encourage website owners to utilize this.
Include images in your sitemap, or create a separate sitemap just for images. Specific sites like WordPress have plugins that make the job easier. Or, if you’d like to tackle it yourself, Google Webmaster Tools provides lots of useful information.
You’ll be giving Google a heads-up about the images on your site, which helps boost the probability they’ll appear in Google Image Search.
#9 Bonus Tip – Take Time to Follow the Above Steps!
When you’re trying to run a business, take care of your customers, and literally not go insane, it can be hard to dedicate time to SEO. And hey, we know that SEO can send website owners into straight-up panic mode (so many keywords, so little time!). Thankfully, image optimization is one of the easiest aspects of on-site SEO – it just takes some time to perform and perfect.
But good things come to those who wait, right? So give your webpage images the attention they deserve and be sure to follow the tips outlined in this article. You could soon be reaping the rewards of enhanced user experience, better SERPs, and increased conversions. We are so good to you.